


4 Great Flight Simulator Setup Examples and Their Cost
6 July 2021 | Updated on February 05, 2024
Stepping into the world of flight simulator is an exciting journey, one that combines the thrill of aviation with the convenience of home-based technology. Whether you’re a student pilot honing your skills, an aviation enthusiast exploring the vast skies, or a seasoned pro keeping your techniques sharp, a home flight simulator setup offers a real-world flying experience right from your living room.
It’s not just about gaming; it’s about gaining valuable flight experience from the comfort of your living room. In this article, we’ll walk you through four great examples of flight simulator setups, ranging from entry-level to pro-grade systems, catering to various budget ranges and levels of realism. Each setup has been carefully curated based on user feedback, performance, and overall value for money.
Join us as we dive into these diverse setups that not only replicate the feel of an actual cockpit but also enhance your flying proficiency. It’s time to elevate your flight simulation experience to the next level!
4 Great Flight Simulator Setup Examples
Flight simulators are as varied as the pilots and enthusiasts who use them. Some prefer simplicity and cost-effectiveness, while others look for the most realistic experience possible, sparing no expense. The good news is, there’s a flight simulator setup for every preference and budget.
Blow, we’ll present 4 unique flight simulator setups. Although quite different from each other, each of these examples is great in its own way and serves a specific need, providing a range of options for you to explore, whether you’re just starting out or seeking the ultimate professional-grade setup.
We will also analyze each setup and give you an estimated cost overview of the different options, which can act as a guideline for your own project.
Side note: a few of the products used below have been discontinued by the manufacturers. We will always mention when we replaced specific products with another in the cost estimate.
These examples may seem familiar to you, as we have mentioned them in our Home Flight Simulator guide. Here, we’ll dive deeper into each of the 4 example setups.
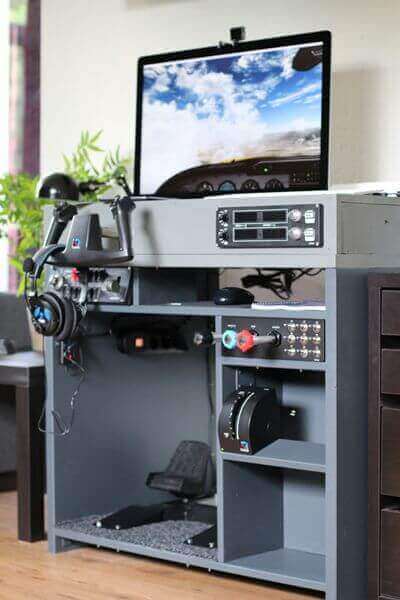
1. Rodger Dodger Aviation’s DIY cockpit
The first home cockpit example is one by Rodger Dodger Aviation, a website covering all things regarding building a DIY home flight simulator cockpit.
His flight simulator setups are often based on a DIY construction using inexpensive PVC pipes to create the cockpit. A big monitor provides great visuals, on top of a second monitor that shows the main instruments. The other hardware primarily consists of Saitek/Logitech hardware, such as the yoke, dual throttle quadrants, and a switch and autopilot panel.
Based on the pictures, we estimated the cost as follows:
| Gaming computer | $1500 |
| Gaming monitor | $500 |
| X-Plane 11 | $70 |
| Logitech Yoke + Throttle | $150 |
| Additional Logitech Throttle | $60 |
| Logitech rudder pedals | $170 |
| Logitech Radio Panel | $150 |
| Logitech Switch panel | $130 |
| Logitech autopilot panel | $150 |
| PVC/Paint/Tools | $120 |
| Total (estimated) | +- $3000 |
(All prices are estimates based on average retail prices in January 2024)
As you can see, it’s a very inexpensive setup, with all the different components totaling around $3000. A great starter setup if you’re on a tighter budget but still want to have the feeling you’re sitting inside a cockpit! Of course, nothing stops you from making it more detailed, with side panels, lights, map holders, or anything else you can think of.
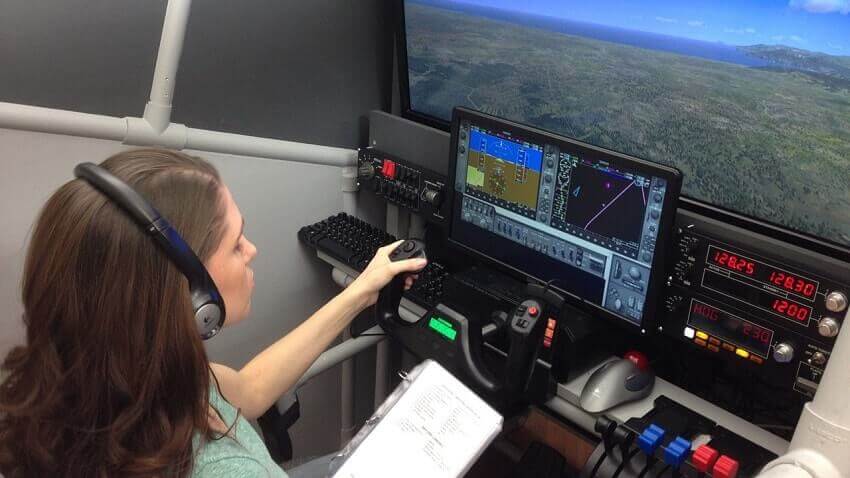
2. Uncertified Pilot’s flight simulator cabinet
This home cockpit was created by a Dutch guy called Tim, who shares his flight simulator experiences on uncertifiedpilot.com (unfortunately not updated anymore since a few years).
Tim custom-built a wooden “desk”, which had compartments for the yoke, throttle, rudder pedals, trim wheel, and more. He sketched his idea first then based the design on that sketch. A great example of what you can achieve with some planning, measuring, home depot tools and a few hours of your time!

The Saitek/Logitech Cessna yoke, throttles and trim wheel have been unfortunately discontinued by the manufacturer. Too bad, as it was an amazing way to elevate your flight simulator experience when you’re planning to fly a Cessna virtually. So in the cost overviews, we replaced them with the standard Logitech yoke and throttle quadrant in the below cost overview (you might still be able to find a second-hand trim wheel online).
Also, the rudder pedals that were used in this project are not available anymore and were replaced by Thrustmaster TFRP Rudder pedals. Lastly, in this project, they used an Apple iMac computer to run the simulator and use as a monitor. However, to maximize compatibility with different hardware and software, we do recommend choosing a Windows-based (gaming) PC.
In the cost overview, we based the price on an average iMac price of $2000, which is comparable to the price of a decent gaming PC plus a high-resolution monitor.
| iMac | $2000 |
| X-Plane 11 | $70 |
| Logitech Yoke + Throttle | $150 |
| Thrustmaster Rudder pedals | $130 |
| Logitech Radio Panel | $150 |
| Logitech Switch panel | $130 |
| Wood/Paint/Tools | $200 |
| Headphones | $100 |
| Total (estimated) | +- $2900 |
(All prices are estimates based on average retail prices in January 2024)
As you can see, this type of setup can be achieved already with a budget of around $3000. Of course, it all depends on exactly what computer you get, what hardware you’ll use, etc.
3. FlightChops’s home cockpit
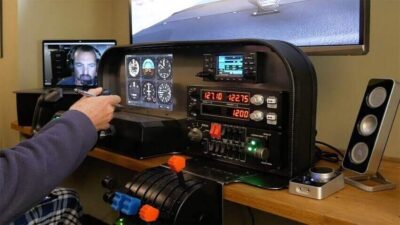
FlightChops, aka Steve Thorne, is a famous aviation YouTuber who creates some incredible videos.
In one of his video projects, he built a complete home flight simulator to help him prep for his IFR training. The full IFR simulator featured a custom-made Stay Level Avionix panel, along with some great hardware to make it as realistic as possible. He later even gave the setup away to one of his followers in a contest!

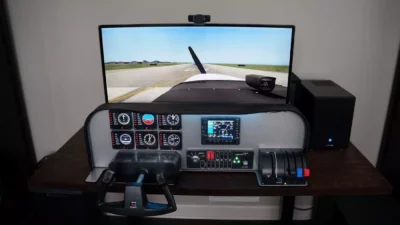
As you can see from the pictures, his setup is fairly straightforward: he has a basic cockpit area, with one main monitor to provide the outside view. On the panel, an iPad Pro 10.5″ serves as the virtual instrument panel using a dedicated app. Other hardware includes a Logitech Pro Flight Yoke and dual throttle quadrants, a Logitech switch and radio panel, and the awesome RealSimGear GNS430 GPS.
He also shared the full components list, which made analyzing his setup a lot easier for us!
| Stay Level Avionix custom avionics panel | $900 |
| Gaming PC | $1000 |
| X-Plane 11 | $70 |
| Logitech Yoke + Throttle | $150 |
| Additional Logitech Throttle | $60 |
| Avionics – 6-pack: iPad Pro 10.5″ w/ RemoteFlight Cockpit HD | $500 |
| Logitech radio panel | $140 |
| Logitech Switch panel | $100 |
| RealSimGear GNS430 GPS | $380 |
| Total (estimated) | +- $3300 |
(All prices are estimates based on average retail prices in January 2024)
The PC he uses is a fully custom-built gaming PC, built to his budget and with the following components:
- Asus ROG Strix Z390-H Gaming Motherboard
- Intel Core i7 8700K
- Samsung Evo 970 250GB NVME SSD
- Asus ROG Strix 2080ti OC
- Corsair Vengeance RGB Pro 16GB DDR4 3200
- Corsair Hydro Series H115i RGB
- Corsair 500D Mid-Tower Case
- Corsair HX750 Power Supply (old)
The full set-up adds up to around $3300 (excluding the main monitor). FlightChops mentioned that the setup only added up to around $2000, but we’ll assume he was able to get some of the components at a discount due to sponsorships. But still, the price is still amazing when you look at the components list and its performance!
4. Stay Level Avionix’ high-quality home flight simulator cockpit panel
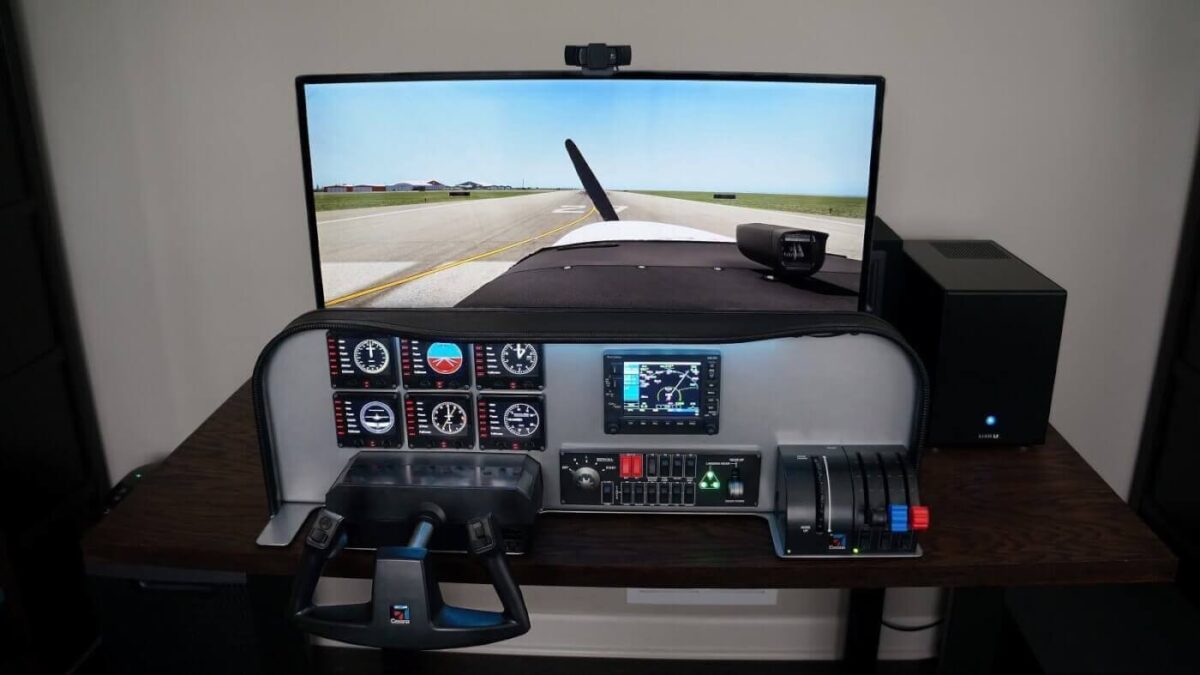
The last example we’d like to discuss in detail is a home cockpit based on a ready-made desktop-mounted panel. This is certainly one of our favorites, as it looks absolutely stunning!
The panels are created by a US-based company called Stay Level Avionix, which offers beautiful powder coated and plasma cut carbon steel flight simulator cockpit panels, completely tailored to the hardware you intend to use. They offer a variety of options, for small or large cockpits, ‘analog’ instruments or glass cockpit, multi- or single-engine aircraft, different yoke/throttle brands, etc. You can either buy a standard panel (you can choose between different setups like glass cockpit, steam gauges, Cirrus perspective, TBM,…), or have one custom-build based on your hardware.

Just like the one above, his setup is primarily based on the Logitech flight simulator hardware, all beautifully integrated into one desktop-mounted cockpit panel. This setup includes a six-pack of Logitech instruments (which could be replaced with a single LCD monitor mounted on the back), a Garmin G530 unit and Logitech yoke, throttle quadrant and switch panel.
Again, we have compiled a ‘shopping list’ to give you an indication of the estimated total cost for a similar project (trim wheel not included as it has been discontinued by the manufacturer, as mentioned earlier).
| Stay Level Avionix panel | $900 |
| Gaming computer | $1600 |
| Gaming monitor | $500 |
| X-Plane 11 | $70 |
| Logitech Yoke + Throttle | $150 |
| Thrustmaster Rudder pedals | $130 |
| Logitech instruments (6x) | $960 |
| Logitech Switch panel | $100 |
| RealSimGear GNS530 GPS | $400 |
| Total (estimated) | +- $4800 |
(All prices are estimates based on average retail prices in January 2024)
This setup is clearly a little more expensive than the one we mentioned before, but it does offer an extra level of quality and simulation experience. Nonetheless, you could get a similar setup for still under $5000, which is not too bad for this level of quality and realism!

What Makes a Good Flight Simulator Setup?
First of all, it’s important to consider what makes a good flight simulator setup.
The term ‘good’ might mean different things to you than to someone else, depending on your requirements, wishes and budget. But generally spoken, a good home flight simulator cockpit should at least have the following characteristics;
Quality controls and hardware
A flight simulator is only as good as the controls it provides. Authentic yokes, pedals, throttles, and instrument panels can significantly enhance the sense of realism, enabling a more accurate simulation of flight dynamics.
The heart of any flight simulator setup is a powerful computer with a fast processor, ample memory, and a top-tier graphics card. Coupled with professional-grade flight simulation software, they render the realistic, responsive environment you need.
There are a few other components that add to the realism, such as a gaming headset, throttle controls and rudder pedals.
You can read more about the recommended flight simulator hardware here.
Comfort
A good flight simulator needs to make you feel at home and comfortable the moment you ‘step inside the cockpit’. Ergonomics are important, as you need to be comfortable for hours while using the simulator. Even if you tell us “it’s just for 30 minutes at a time”, as we both know that won’t be the case for long!
This might be achieved through a high-quality chair or gaming seat, which are both adjustable in all directions (height/tilt). Add to this foot pedals that allow for natural movement of your feet without having to keep them flat.
Realism
Your cockpit should have a high enough fidelity to make your experience feel real. You want something that is realistic and not too costly to build, but still has an authentic look and feel.
Sufficient space
Your flight simulator setup should have sufficient space for your controls, PC, monitor(s) and any other tools you want to use; such as iPads, maps, checklists, etc. By having enough space, it’s easier to make sure your cockpit is comfortable and realistic, just like in real life.
As your skills evolve, your setup should be able to grow with you. A good simulator setup leaves room for upgrades, whether it’s adding more screens, controls, or switching to more advanced software.
Realistic visuals
The visual aspect should be clear and feel realistic, with decent hardware and a good monitor. Visuals are important to get the most out of your flight simulator setup. If you can, try investing in a monitor that is big and curved, so it feels more immersive.
Large screens or VR headsets, paired with high-resolution graphics, provide a lifelike view of the cockpit and the environment, contributing to a convincing flight simulation.
Advanced Audio
Sound plays an essential role in simulating a real flight environment. Surround sound systems or high-quality headphones can mimic the in-cockpit and external noises accurately, adding depth to your simulation experience.

Conclusion
From the budding aviation enthusiast to the seasoned pilot, flight simulators offer a broad range of experiences, capturing the thrill and technicality of real-world flight within the comfort of your own home.
Whether it’s just for fun or if you want to improve your skills, these are all great examples of what other people have done with their simulators. Prices range from anywhere from a few $100 to well over $4000.
As you have read above, there are many ways you can get a home flight simulator cockpit, depending on what you are planning to use if for, your wishes and, of course, your budget. You can put one together using available cockpit hardware and controls, or build one yourself from scratch. If you have a bigger budget, a pre-build cockpit panel is a great option for the ultimate home flight simulator experience.
Whether you’re practicing maneuvers, learning new aircraft systems, or simply exploring the virtual skies, your flight simulator is an invaluable tool and a source of endless adventure.
If you want to learn more about building your own home flight simulator cockpit, we highly recommend checking out our How to Build a Home Flight Simulator: A Step-by-Step Guide, and The Best Flight Simulator Software and Hardware.
Or click here to see all Flight Simulator articles!
Good luck!
Cover photo © FlightChops